

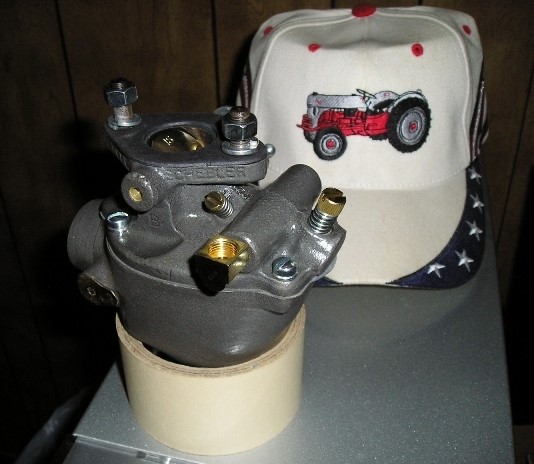
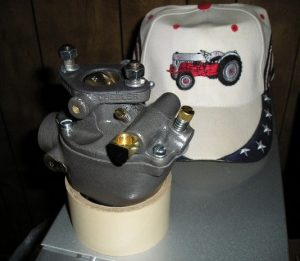
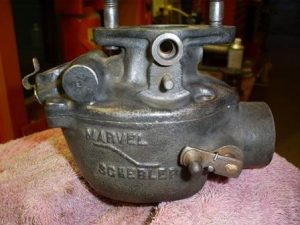
Marvel Schebler TSX Carburetor
How to rebuild this iconic old Carburetor
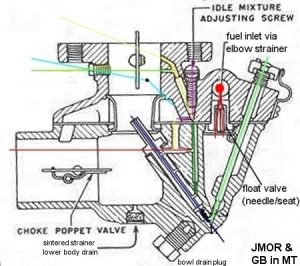
Operation
Information you should know:
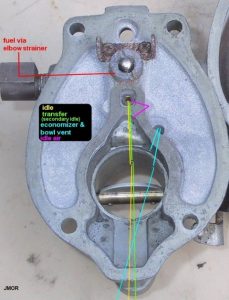
The purpose of the carburetor is to atomize the fuel into the air that is supplied to the motor at the right ratio. Fuel enters the carburetor through the elbow strainer. From there it arrives at the float valve. The float controls the amount of fuel that’s allowed to be stored in the float bowl. When the float drops, the needle valve opens allowing fuel to enter the bowl. Fuel in the bowl passes through the main/power jet and fills the chamber where the fuel nozzle is found. The main jet meters the rate at which the fuel flows into the main jet cavity. The nozzle with holes in the sides allows extra fuel to be stored in the area so that if the throttle is opened quickly the extra fuel stored is available to quickly enrich the increased air volume for quick acceleration while the main jet meters what can continue to enter. Modern carburetors use accelerator pumps for this purpose.
The main jet passageway is also the source of fuel for the idle circuit. Fuel at idle is drawn out of the main jet area and through the idle jet. The idle adjustment screw determines how much air is mixed with the fuel. Screwing the adjustment screw in reduces air and creating a richer mixture.
The economizer jet plays a role in regulating the pressure/vacuum in the fuel bowl. The vacuum applied to the bowl and resulting air movement changes with relation to the throttle position and also as the throttle position is changed. The pressure/vacuum in the throttle bowl are a factor that affects fuel movement from the bowl through the main jet.
The choke is used to create a richer mixture of fuel which is sometimes needed for cold starts. This enriched fuel mix is required due to the way fuel atomizes in cold temperatures. The choke plate is used to restrict the amount of air entering the carburetor and increase the suction on the fuel nozzle. The increased suction results in a richer mixture. A few degrees in movement in the choke plate makes a big change in the fuel mixture ratio. The spring loaded relief valve is provided to reduce the amount of manipulation required by the operator. Due to how much more fuel the choke is capable of delivering, its usually easy to flood your tractor by using the choke too soon during cranking or using it too long. Many operators find it best to try to start the tractor first with 1/3-1/2 throttle. If it doesn’t start try again with light operation of choke as the motor turns over followed by a quick release of the the choke.

Passageways
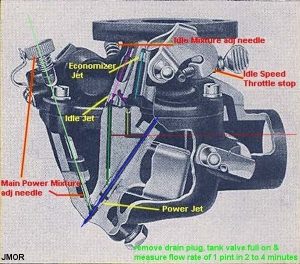
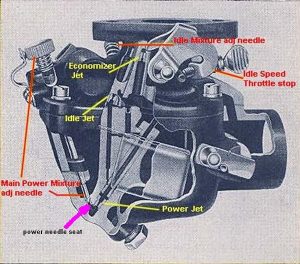
In order to service these carburetors you must understand the passageways in the carburetor. These passages make up specific circuits like the idle circuit, the power circuit, and the choke circuit.
The following images are color coded so that you can follow them through these circuits and see where they connect to one another. The pictures are presented as identification of the passageways and how to get to them for purposes of cleaning. Some of the passageways are as small as ~.030 or #20 – #220 gauge telephone wire. Copper wire can be inserted into the passageways to verify that they are clear. also, copper is soft so it won’t damage the passageways.
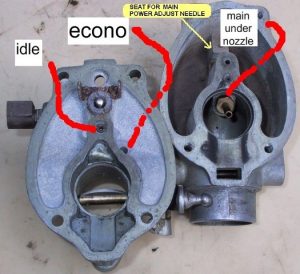
Bowl and upper body passages
Idle and power passages:
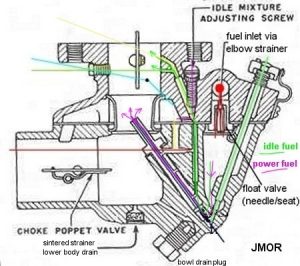
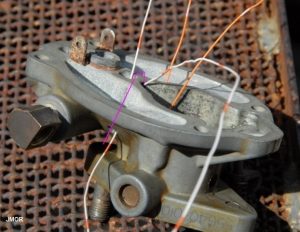
This picture shows the passages that make hard turns inside the carburetor. Note the color of the wires so that you can see which ports are connected.
Jet Information
These Carburetors are over 70 years old and Marvel Schebler was a carburetor provider to numerous tractor manufacturers. Many of the parts will interchange between different models. In addition, due to the upgrades to the carburetors over the years and different sizes being furnished by providers unless your carb runs correctly you should not assume it has the correct jets in it. The following information is provided so you can identify the jets used for the TSX 33 and 241.
Here are some existing jets along side of new jets. Note the difference in orifice sizes. There are too many jets that will fit to assume you have the correct ones.
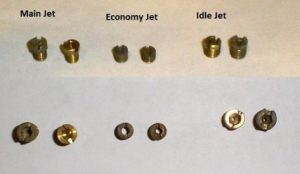
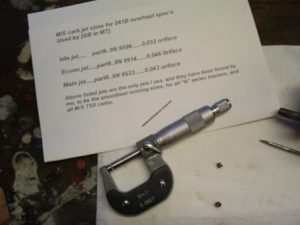
Marvel Schebler carb jet sizes for 241B overhaul spec’s
Idle jet….. part#..9N 9596……0.032 orifice
Econo jet…..part#..9N 9914……0.046 orifice
Main jet…..part#..9N 9533……0.043 orifice

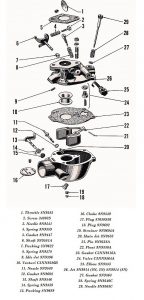
Exploded View:
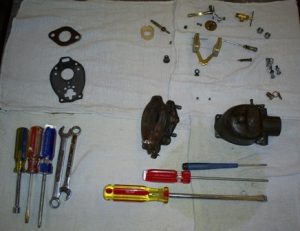
Cleaning the Marvel Schebler carburetor on Ford Tractors
Due to the fact that these carburetors are cast iron that rusts and the occasional foreign materials that find their way to the carburetor, it is necessary to clean the carburetor from time to time. The following is a disassemble, clean, and reassemble procedure…
Shut the fuel valve off on the bottom of the fuel tank. Remove carburetor from the Tractor by disconnecting the 2 linkage rods, air tube, and fuel line. Remove any gasket material from the bottom of the intake manifold. Note: the fuel line will be full of gas.
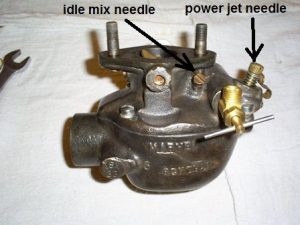
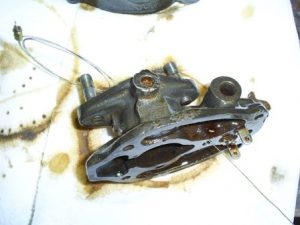
Remove the idle mixture screw & spring, power jet needle & spring, and fuel strainer elbow. Remove the 4 body screws and carefully separate the body halves.
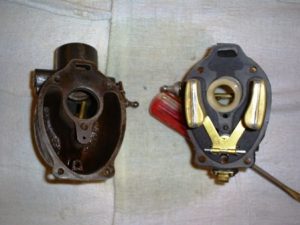
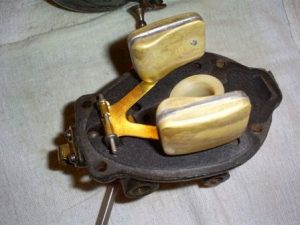
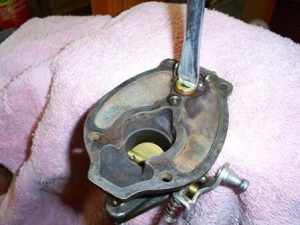
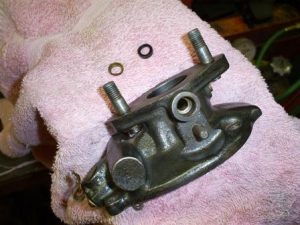
Remove the float by pulling the small pin out. Gently shake the float and listen for liquid. If any is heard replace the float. After removing the float remove the 3 sided float needle and venturi.
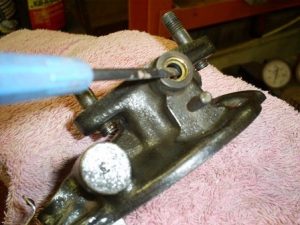
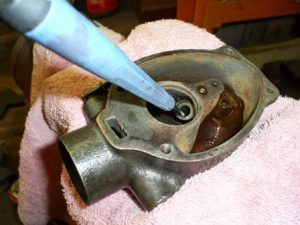
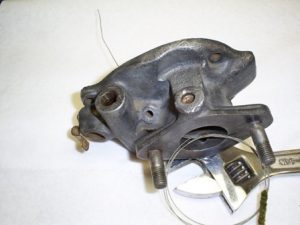
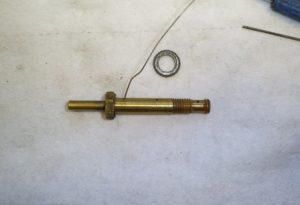
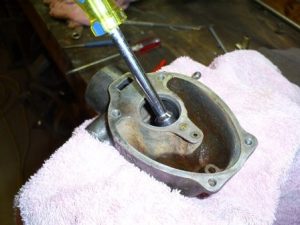
Remove the float valve seat. Note the modified screw driver I’m using. The seat is easily damaged if the screwdriver does not engage the seat fully. This was an inexpensive screwdriver that was ground down to fit the seats. Note the carb top is in a vice with a towel so as to not damage the casting. Keep pressure on the screwdriver to keep it engaged in the seat.
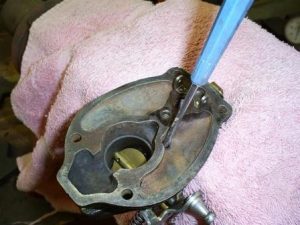
Remove the idle jet. Use a screw driver with the widest blade that will fit. Keep the blade seated firmly in the jet when removing to avoid twisting the top off.
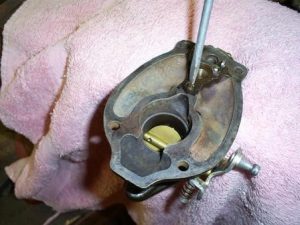
Remove the economizer jet using the widest screwdriver that will fit. I have ground the sides off a couple screwdrivers who tips fit. Many screwdriver shanks are wider than the tip. Keep the blade seated firmly in the jet when removing to avoid twisting the top off.
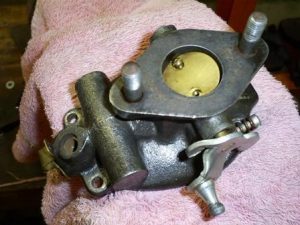
Remove the throttle butterfly by removing the 2 screws. Note the orientation of the butterfly. With the butterfly out, gently pull the throttle shaft out of the side of the casting. Note how much play the shaft has up and down. The bore can wear in the casting which can be re-bushed and the throttle shafts wear which can be replaced.
Remove the throttle shaft seal and seal retainer. Here you can see the seal behind the retainer. The retainer is a light press fit and can be removed by gently prying behind it and working around the casting.
Here the throttle shaft seal and retainer are removed. Note that this carburetor has had a bushing installed in the throttle shaft bore. This is a common repair and the bushing is available from the usual sources.
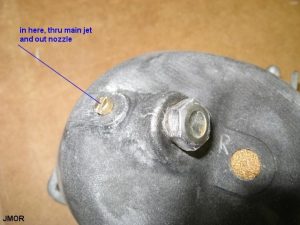
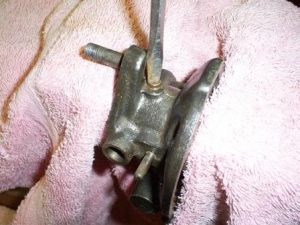
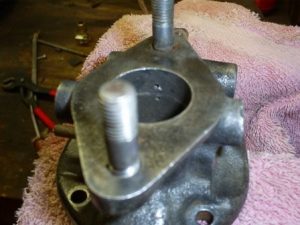
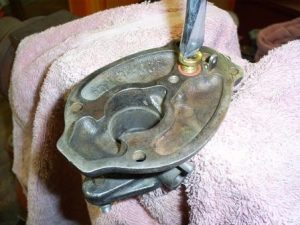
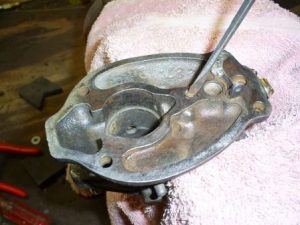
Remove the front hole plug. This hole was used in the manufacturing process only and we will use it to gain access to the small diameter holes in the upper carburetor bore. It may be necessary to back out the stud bolt to gain access to the plug.
Mount the lower casting in the vice.
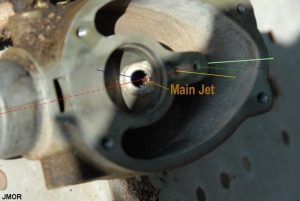
Remove the main nozzle. I use a 3/8 nut driver.

Remove the main jet using the widest screwdriver that will fit. I have ground the sides off a couple screwdrivers whose tips fit. Many screwdriver shanks are wider than the tip. Keep the blade seated firmly in the jet when removing to avoid twisting the top off.
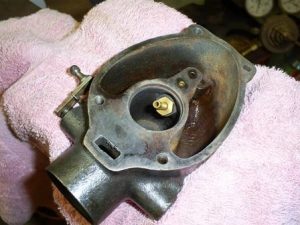
Remove the plug on the bottom of the carburetor. This plug is used to diagnose fuel flow problems but the area is frequently plugged with rust making the test result misleading. These passages lead to the inside of the fuel bowl. Open them with a piece of wire.

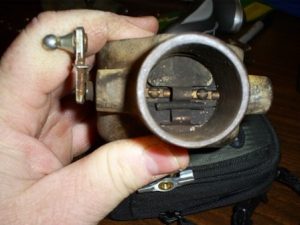
This is a choke butterfly installed backwards. If you see this you need to remove the choke plate and shaft. Unless you have this problem or have a leaking choke packing I recommend not removing the choke plate.
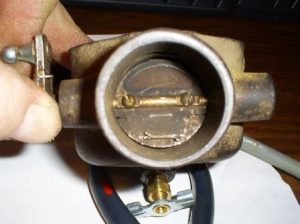
This is properly installed choke plate. Again I wouldn’t remove it unless necessary. I’ve done it and there are 2 springs in play, a slotted shaft and small tabs that have to be un-bent and re-bent which causes them to break.
Scrape any remaining gasket material off being careful not to gouge the castings. Place the two castings in a gallon of carburetor cleaner and allow to soak. If the carb hasn’t been cleaned in years you may want to soak it for a couple of days. This carb was cleaned recently but wasn’t idling right. I soaked it overnight. This is a place for safety glasses and rubber gloves.
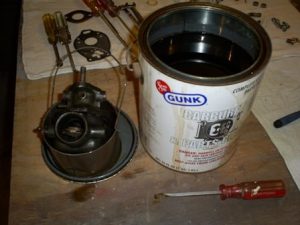
While your castings are soaking inspect all the parts. Replace any worn or damaged parts. I usually only replace parts that are worn or damaged. If you don’t know the history of the carb or its in bad shape it may be advisable to order a full kit.
Carburetor assembly
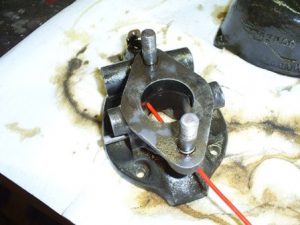
Remove the parts from the carburetor cleaner. While the casting is still wet, run a wire through all the passages. I use guitar strings.
I can always get a wire through the top hole shown. I can sometimes get a wire through the lower hole as it does a tight turn. Not shown is the hole to the side which is visible if the casting is turned over, it is part of the economizer circuit, which I can’t always get a wire through either. I use Carb Cleaner in a pressurized can to blow through any ports that I cannot get a wire through. Do the same to the lower casting.
Clean the castings using your favorite canned quick drying solvent. Use the front access hole to spray cleaner in each of the holes ensuring the solvent is exiting a different hole. Here the tube is being directed to the economizer circuit. This is another place for safety glasses and gloves. Follow-up with compressed air directed to all the passages.
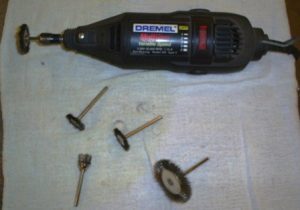
Your castings may still have some residue on them. I use a Dremel tool with small wire wheels to clean my castings.
After cleaning your castings, run the wire through all the passages again. After cleaning and running the wire through the passages, clean them again with compressed solvent and follow-up with compressed air directed to all the passages.
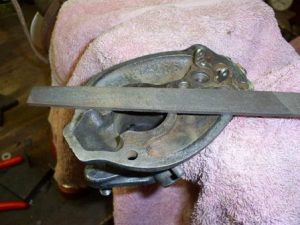
Run a fine mill file lightly across the mating surfaces to remove any burrs only, and only as needed.
Check to see if the castings mate. There are many carbs out there and the halves may have been swapped or the castings could be damaged or warped. While you may be able to double gasket the carb the dimensions for the venturi are dependent on one gasket being used.
Verify the orifice size on your jets with the graph above. You can use number drills, or welder tip cleaners or any way you can. There are simply too many jets out there to assume yours are correct. I used a set of welder tip cleaners and very small drill bits finding the ones that fit then checked them with a set of micrometers or calipers.
Install the main jet. Use the widest screwdriver that will fit and snug the jet in but don’t over tighten. Note the camera has a way of bringing out reds and the casting appears rusted in the photo, it’s actually much cleaner in person. Install the plug on the bottom of the carb.
Clean the small holes in the main nozzle. There should be three. There are other nozzles out there that fit that have different hole arrangements.
Install the nozzle using a gasket under the hex head. (picture from teardown)
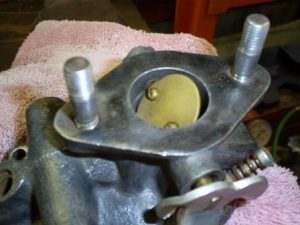
Install the throttle shaft seal lips pointing in, install the retainer which is a very light press fit. I always use a new shaft seal. Install the front plug that was used for access to the small holes in the throat.

Check the fuel needle valve. It may be viton (rubber) tipped or just steel. Either is acceptable. Observe the hole in the seat for burrs. Check to see that the needle moves in the seat without burrs or snags.
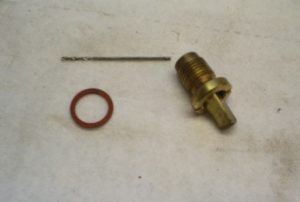
Install the float valve seat and gasket. Use a screwdriver that fits (modified if necessary) and tighten securely. Fuel leaking around this seat can cause other problems.
Install the idle jet
Install the economizer jet.

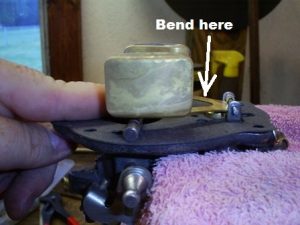
Install the throttle shaft and butterfly. If you’ve lost the orientation of the butterfly it’s easy to determine. The edges are not machined square and if you observe how it opens it won’t take long to see how it should fit plus the screw holes are slightly off center. I rotate the shaft as I tighten the screws down getting the butterfly to center/seat in the opening.
Install the fuel needle, body gasket, and float. Check the float height. I use a 1/4″ diameter drill bit as a gauge. Here the float height is set properly as the float just touches the drill bit. If needed gently bend the float as shown. I set my float parallel to the casting which can be a subject of discussion.
Remove the float and install the venturi. It only fits one way and if you check you will see that one end is larger than the other. Run the small end through a new body gasket and reinstall the float. Don’t forget to verify the float needle valve is still in.

Mate the two halves and install the four body screws. I wiggle to two castings in an attempt to get them to center over the four screws. Just before the four screws are tightened, I verify that the power jet needle can be installed fully which requires the castings to be aligned. Once checked back it out and fully tighten the four screws. A test to check that the float is not binding is to gently turn the carb upside down then back up and listen for the float. You should be able hear it as it hits its travel limits.
Install the power jet needle/spring/gasket, and run it in until it bottoms out. Back the screw out 1.5 turns. Install the idle mix needle/spring and run it in until it bottoms out. Back the screw out .75 turns. Install the fuel strainer and install the completed carb on the tractor. If completed as shown and the tractor is in good shape, it will start on these settings once the fuel bowl receives gas.
Warm the tractor up and adjust as follows:
Adjust the idle mix for smoothest operation. Backing the screw out leans the mix and with a lean mix the tractor will begin to “pop” in the exhaust. Running too rich will produce a somewhat more constant labored “bub-bub-bub” sound. My idle mix needles are usually adjusted around .5 turns out. Adjust the idle screw (on the throttle shaft) for idle rpm which the manual says is 400 rpm. Unless you have a tractormeter or other gear you will not know where 400 rpm is but its slower than your car. I don’t get to worried about the actual RPM and just adjust for a slow smooth idle.
The power jet is checked by quickly opening the throttle. If the tractor stumbles, open (back out) the needle a little more. If the motor responds well but produces a sooty exhaust the mix is too rich and the valve can be run in a little. Only move the needle in 1/8 turn increments and adjusting the power jet can affect the idle jet setting. Backing the needle out enriches the mix.
Adjust the carb then operate the tractor under a load. Only make small adjustments and then run the tractor some more. It may be necessary to complete this sequence 2 or 3 times to dial in the settings.
Natural finish
I hope you found this to be helpful…


20 Comments
This is the best I’ve seen on how to clean a marvel schebler. Thanks! It really helped.
Hi Mark, great descriptions!
I have a 1946 Ford 2N with a TSX241B (also 855 on the brass tag) that I’m attempting to rebuild. As it wouldn’t start, was flooding and I found fuel dripping from the hose when I pulled it off the carb.
The kit came with the rubber packing for the throttle shaft, but no brass retaining ring, which is okay, since the carb seems to have bushings in the bore.
The kit didn’t include packing for the main adjustment needle, the carb has fibrous packing, no biggie I guess.
The kit came with two jets, the carb doesn’t even have threads where and econo jet would have gone. Would that likely be why it’s flooding? Leave it as is or tap it and install the jet from the kit?
Hey Chuck,
You have likely repaired this by now, but I will try to help. Flooding can occur for three reasons… Either the float isn’t set properly, the needle and seat are worn and can’t shut off the gas flow, or the float has holes in it which allows it to sink rather than float. Those items are your culprit. Did your kit come with a float, and a needle & seat? If so, replace them. If not, get them and replace them and that should fix your problem.
Process was very helpful in cleaning up and resetting a Marvel we have on a ’45-Farmall A. It was nasty inside and I think water was sitting in the bottom and freezing the float to the bottom. Cleaned it right out, made a few new gaskets, strapped it back on and she started right up without flooding out the air intake. TY for posting.
I have an old Ford 800 series. I misplaced my info on the year, it was one of the 3 years of mid 50,s. I cant get the carb. set right. It will run right for some time then terrible again. If you are not to far away and I could bring it to you, would you consider working on the carb?
Where are you located?
8n industrial engine do you have to have 90 lbs compression to start engine.having trouble starting.çylinders 1 76 lb 2 80 lbs 3 80 lbs 4 90 lbs compression ?
I’m not as familiar with the 8N. I would think that you have enough compression to run. Yes you need compression to run well, but more importantly is gas mixture and spark. Are you sure you have a good spark on those cylinders?
I have a 8n industrial engine in my 8n 1952 tractor side mount distributor.no sleeves how do I know if I have the correct carbporater?
The carburetor for that year is an 8N9510 or an 8N9510C from my search. You can look at pictures of it on the internet and even if it is the wrong carb, you manually set the mixture, so it really shouldn’t matter as long as the compression is pulling the mixture into the cylinder.
excellently written and easy to understand ! Pictures of carb. parts a real big asset to the article. I’m darn glad I came across this Route 249 article because I was going nuts trying to find information on how to adjust these Marvel-Schebler carbs. Mine is a M-S model TSX593. Damn hard to find info. on it.
I’m glad you found it useful. There aren’t many of us left that even know what one is. If you just name drop “Marvel-Schebler” into a conversation, most would think it’s the newest Spiderman Movie.
Take care Wild Bill, and I’m glad you found it informative.
Very well written tutorial….
I looking for Marvel Schebler TSX 860 (John Deere 1010 dozer
mid 60’s) parts and information…
I posted your coment and maybe one of the readers will be able to help you out… Good Luck
Mark just awesome article. So nice you shared it. Thank you!!!!
FANTASTIC!!! Great very clear and concise explanation, just what I have been looking for, thank yo sir.!!!!!!!!!!!!!!!
Excellent tutorial! I was showing my mechanic son aged 14 how the updraft carburetor works and this article explained how we need to clean our 62 Ford 4000 industrial tractor carb! After the job she runs just beautifully! Thanks
Mark, this is the most informative written procedure I’ve seen on the internet. Thank you. My 1946 2N runs perfect now .
Mark, Do you do this type of rebuild work?
Yes, I have a 1961 Ford Workmaster tractor. It uses the Schebler carburetor and I had to rebuild it. That’s why I decided to include this article.